Welcome to our in-depth Shopify tutorial, designed specifically for beginners eager to launch their online store. In the ever-expanding world of e-commerce, Shopify stands out as a user-friendly and versatile platform that empowers entrepreneurs of all levels. Whether you’re starting from scratch or looking to enhance your existing online presence, this guide is tailored to provide you with the essential tools, insights, and best practices to succeed with Shopify.
From setting up your account to designing your store, adding products, configuring payments, marketing, managing orders, analyzing performance, and uncovering valuable tips and tricks, we’ve got you covered. Dive into this Shopify tutorial and take the first step towards turning your e-commerce dreams into reality. Let’s begin your journey to success!
Table of Contents
Introduction to Shopify
Shopify is a leading e-commerce platform that enables individuals and businesses to create and manage online stores with ease. Whether you’re a budding entrepreneur or an established retailer, this Shopify tutorial for beginners will guide you through the essential steps to launch your online presence.
What is Shopify?
Shopify is a cloud-based, SaaS (Software as a Service) platform that offers a range of customizable features to build your online store. From product management to payment processing, Shopify provides all the tools you need to run a successful e-commerce business. If you’re curious to see how it works, Shopify offers a free trial that allows you to explore the platform without any commitment.

Why Choose Shopify for Your Online Store?
Shopify stands out for its ease of use, flexibility, and comprehensive support. Here’s why it’s a top choice for many online retailers:
User-Friendly Interface
Even if you’re new to e-commerce, Shopify’s intuitive design helps you set up and manage your store without needing technical expertise.
Customizable Themes
With a wide variety of themes, you can tailor your store’s appearance to match your brand’s identity.
Secure Payment Options
Shopify offers multiple payment gateways, ensuring a smooth and secure checkout process for your customers.
24/7 Customer Support
Whenever you need assistance, Shopify’s support team is available around the clock to help you resolve any issues.
Scalable Solutions
Whether you’re starting small or planning to expand, Shopify’s plans cater to businesses of all sizes.
How Shopify Can Align with Your Business Goals
Understanding your business goals is crucial when choosing an e-commerce platform. Shopify offers flexibility and scalability, making it suitable for various business models and industries. From selling physical products to offering digital downloads, Shopify’s features can be adapted to meet your specific needs.
In this Shopify tutorial for beginners, we’ll explore each aspect of setting up and running a Shopify store, ensuring you have the knowledge and confidence to embark on your e-commerce journey. Stay tuned for detailed insights and practical tips!
Setting Up Your Shopify Account
Creating a Shopify account is the first step in your e-commerce journey. This process is straightforward and user-friendly, even for beginners. In this section of our Shopify tutorial for beginners, we’ll guide you through the essential steps to set up your account and choose the right plan for your business.

Creating an Account
Visit the Shopify Website
Navigate to Shopify’s homepage or directly access the free trial page to begin.
Enter Your Email Address
Provide a valid email address to start the sign-up process. This will be your primary contact for all Shopify communications. Then follow the prompts and tell Shopify about your business including where you plan on selling and what do you plan on selling. Last, but not least create your Shopify ID and choosing a secure password.
Complete the Initial Setup Guide
Follow the prompts to complete the setup, and your store will be ready to customize. The setup guide includes a few tasks, but we recommend creating a name for your store and setting up a custom domain in Shopify first since we’ll cover the rest in detail later on.

- Add Your First Product: Write a description, add photos, and set pricing for the products you plan to sell. We’ll cover this in detail later on so don’t do this just yet.
- Customize Your Online Store: Choose a theme and personalize it to reflect your brand’s style.
- Add a Custom Domain: You can buy a domain directly in Shopify or connect an existing domain to make your store easily accessible.
- Name Your Store: Ensure your store name aligns with your brand and products.
- Set Up Shopify Payments: Configure payment options to facilitate smooth transactions. You may also earn a $50 credit as part of the setup.
Choosing the Right Plan
Shopify offers various pricing plans to suit different business needs and budgets. Here’s a brief overview:
- Basic Shopify: Ideal for new businesses or online businesses new to in-person selling.
- Shopify: A more comprehensive plan for growing businesses with additional features.
- Advanced Shopify: For scaling businesses that need advanced reporting and support.
Understanding Pricing
Shopify’s pricing is transparent, with no hidden fees. You can view the full details of each plan on their pricing page. If you’re starting with the free trial, you can explore the platform and choose a plan later. Keep an eye out for seasonal promotions or discounts that may apply.

Designing Your Shopify Store
Designing your Shopify store is an exciting step in your e-commerce journey. It’s where you can infuse your brand’s personality and create a visually appealing shopping experience for your customers. In this section of our Shopify tutorial for beginners, we’ll explore how to select a theme, customize the layout, and add products to your store.
Selecting a Theme
Shopify offers a wide range of themes to suit various industries and styles. You can choose from free or premium themes, each offering different design options and functionalities.
Browse the Theme Store
Explore Shopify’s Theme Store to find a theme that aligns with your brand. To access the Shopify go to Shopify admin and click on “Online Store” > “Themes.” Then, locate the “Explore more themes” section and click on “Visit Theme Store.”

Preview Themes
Once you are browsing through the available themes make sure to preview a few options. Before committing, preview how the theme looks by clicking on “View demo store” on the themes page.

Install the Theme
Once you’ve found the perfect theme, click “Add to Theme Library” to install it.

Customizing the Layout
Shopify’s user-friendly interface allows you to customize your chosen theme to match your brand’s aesthetics.
Access Theme Customizer
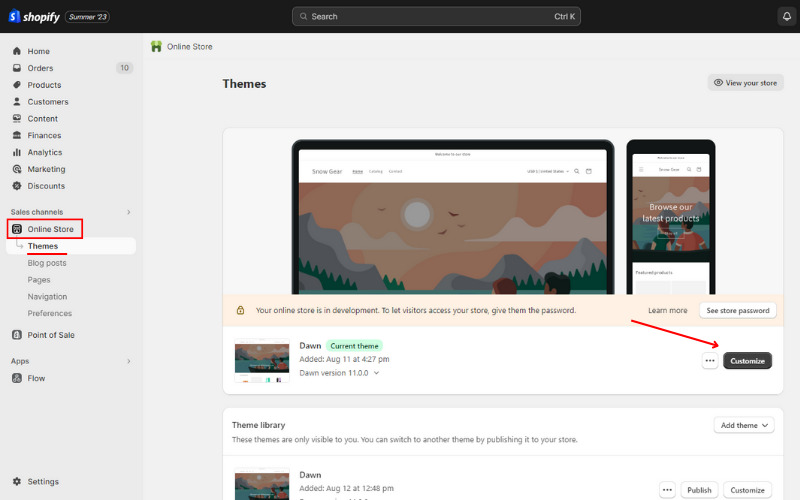
From your Shopify dashboard, go to “Online Store” > “Themes” > “Customize.”
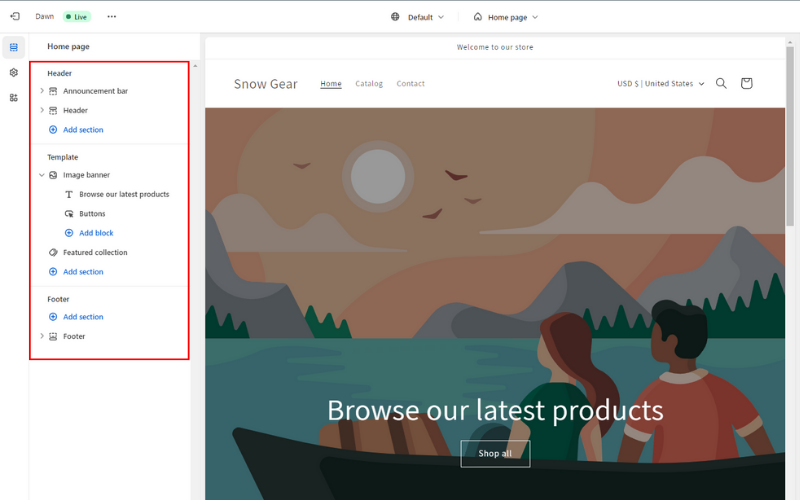
Edit Sections
Add, rearrange, or remove sections like banners, product grids, and testimonials.
Change Colors and Fonts
Click on the theme settings gear icon to tailor the color scheme and typography to reflect your brand’s identity.
Add Logo and Favicon
Upload your logo and favicon to make your store recognizable.

Organize Your Menu
Structure your navigation menu to include essential categories, collections, and pages.

Adding Products and Collections
Adding products and organizing them into collections is a vital part of setting up your Shopify store. This process ensures that your customers can easily browse and find the items they’re looking for. In this section of our Shopify tutorial for beginners, we’ll guide you through adding products, creating collections, and emphasizing the importance of quality in your offerings.
Adding Products
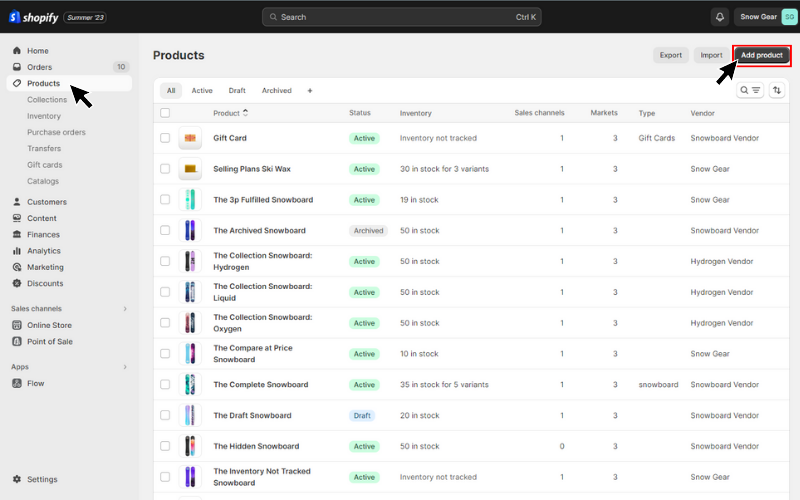
Adding products to your Shopify store is a straightforward process, and here’s how you can do it: From your Shopify dashboard, navigate to “Products” > “Add Product.”
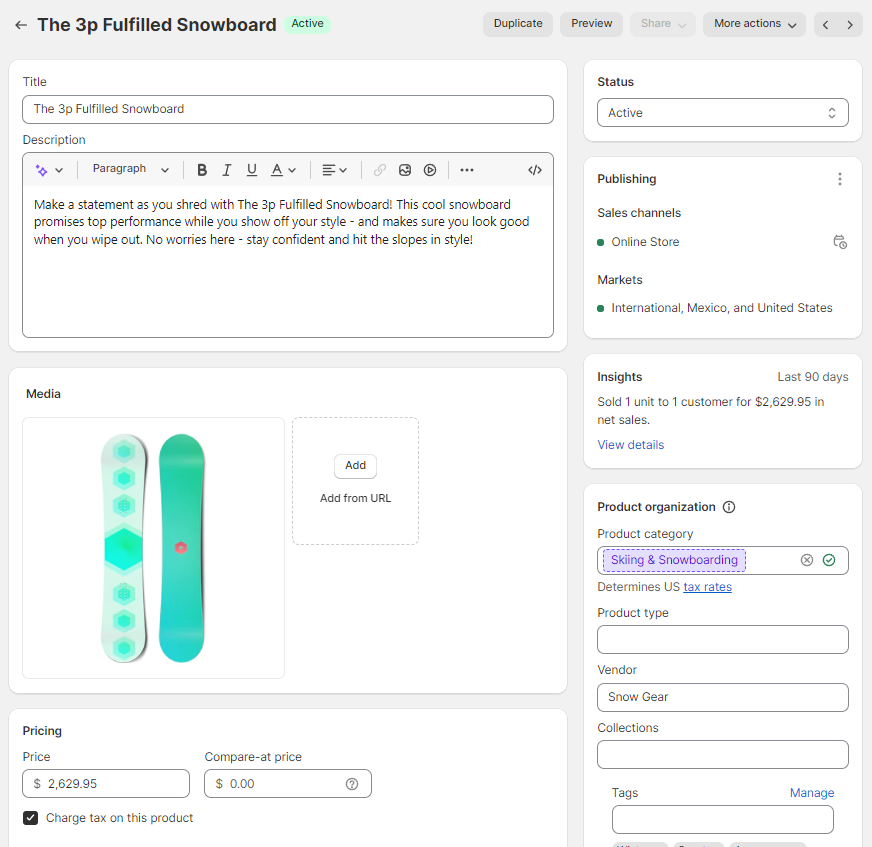
- Enter Product Details: Fill in the necessary information such as title, description, price, SKU, and barcode. Your product title and description should accurately describe what you’re selling. Invest time in writing detailed and SEO-friendly descriptions.
- Upload Media: Upload high-quality images, videos, or 3D models of your product. Embed YouTube or Vimeo URLs for videos to minimize page load speed.
- Set Inventory and Shipping: Define the stock levels, weight, and shipping options for the product. Fill in details like SKU and barcode, and manage inventory tracking. Indicate if it’s a physical product and add weight and customs information.
- Add Variants: If the product comes in different sizes, colors, or other variations, you can add them here.
Optimize for Search Engines
Edit the Page title, Meta description, and URL handle to align with Google’s character limits. This ensures that your product appears correctly in search results. On the product editor scroll to the bottom of the page and locate the “Search engine listing” section.
Pro Tip: Make sure to customize your search engine listing. Otherwise, Shopify will use your product information, such as the title and description, as the default settings.

Creating Collections
Collections help categorize products, making it easier for customers to browse related items. Here’s how to create them: Navigate to “Products” > “Collections” > “Create Collection.”
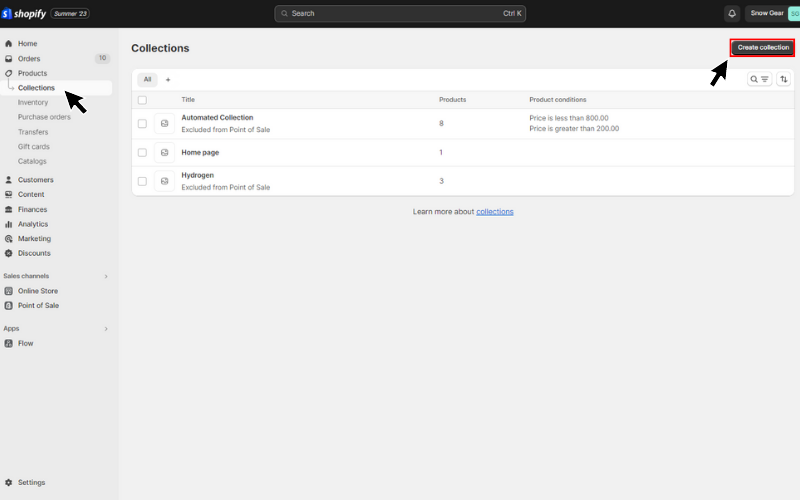
- Name and Describe the Collection: Provide a relevant name and description that explains what the collection includes.
- Set Collection Conditions: You can create manual collections by selecting products individually or automated collections based on specific criteria like product titles, product tags, product category, product vendor, product tag, price, compare-at-price, weight, stock, and variant titles.
- Add Collection Image: Upload an image that represents the collection, enhancing visual appeal.
- Save the Collection: Click “Save” to make the collection live on your store.

Emphasizing the Importance of Quality in Products
Quality is key to building trust and encouraging repeat purchases. Ensure that your product descriptions are accurate, and images are clear and professional. Highlighting quality aspects, certifications, or unique features can set your products apart.

Payment and Shipping Configuration
Configuring payment and shipping options is a critical step in setting up your Shopify store. It ensures a smooth checkout process for your customers and helps you manage order fulfillment efficiently. In this section of our Shopify tutorial for beginners, we’ll walk you through setting up payment gateways, configuring shipping options, and managing taxes.
Setting Up Payment Gateways
Payment gateways enable your customers to pay for their purchases securely. Here’s how to set them up: From your Shopify dashboard, navigate to “Settings” > “Payments” > “Activate Payments.”
Pro Tip: Ensure you are able to use Shopify Payments by checking if your product category is not restricted in the Shopify Payments terms of service.
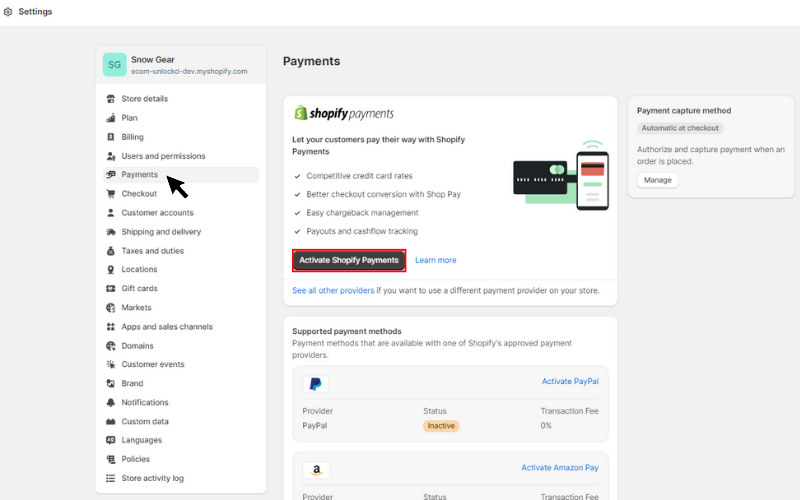
- Choose a Payment Gateway: Shopify offers various payment options, including Shopify Payments, PayPal, and third-party providers.
- Enter Required Information: Depending on the chosen gateway, you may need to provide account details, credentials, or other information.
- Configure Payment Settings: Set up payment authorization, currency, and other preferences to match your business needs. Confirm and save your payment settings.
Configuring Shipping Options
Shipping configuration ensures that your customers receive their orders promptly and accurately. Here’s how to set it up: Navigate to “Settings” > “Shipping and Delivery.”

- Set Up Shipping Zones: Define shipping zones based on regions or countries you ship to.
- Choose Shipping Rates: You can set flat rates, calculated rates, or free shipping options. Consider offering free shipping for orders over a certain amount to incentivize purchases.
- Add Package Information: Provide details about your standard packaging sizes and weights.
- Integrate with Carriers: If you use specific carriers, you can integrate their services for accurate rate calculations.

Managing Taxes
Handling taxes correctly is essential for legal compliance. Shopify can automate tax calculations for you: Navigate to “Settings” > “Taxes and Duties.”

- Configure Tax Settings: Shopify automatically sets tax rates based on your store’s location and the shipping destinations. Review and adjust if necessary.
- Set Up Tax Overrides: If you have specific tax rules for certain products or regions, you can set up overrides.
- Save Tax Settings: Confirm and save your tax settings.
Marketing and SEO Strategies
Marketing and SEO (Search Engine Optimization) strategies are essential for driving traffic to your Shopify store and converting visitors into customers. In this section of our Shopify tutorial for beginners, we’ll explore how to integrate social media, utilize SEO best practices, and build customer trust through top-notch customer care.
Integrating Social Media
Social media platforms are powerful tools for reaching and engaging with your target audience. Here’s how to leverage them: Link your Shopify store to social media platforms like Facebook, Instagram, and TikTok. We recommend you use the official Shopify apps for this to make things easier. Go to “Settings” > “Apps and sales channels” > “Shopify App Store.”
We left you the links to the apps below to make things easier:
Once you install any of the apps above in your store the setup should be streamlined and all you need to do is follow the prompts and link your accounts.

Share Engaging Content
Regularly post updates, promotions, and engaging content to build a community around your brand.
Utilize Social Shopping Features
Platforms like Instagram offer shopping features that allow customers to purchase directly from your posts.

Utilizing SEO Best Practices
SEO helps your store rank higher in search engine results, making it easier for potential customers to find you. Implement these best practices:
- Use Relevant Keywords: Identify keywords relevant to your products and include them in product titles, descriptions, and meta tags.
- Optimize Images: Add descriptive alt text to images, helping search engines understand their content. To add alt text to your product images go to “Products” open any product and click on the product image you wish to add alt text to from the “Media” section. Once the screen shown below pop ups locate the “Edit alt text” link and enter your Alt Text.
Pro Tip: If cannot decide what to add as alt text check out this alt text decision tree to help you out.

- Create Quality Content: Write informative and engaging blog posts or guides related to your products, using relevant keywords.
- Build Backlinks: Encourage reputable sites to link to your store, enhancing your site’s credibility.
- Utilize Shopify’s SEO Tools: Shopify offers built-in SEO tools to help you optimize your site. Make use of them to improve your rankings.
Building Customer Trust with Top-Notch Customer Care
Trust is vital for online shopping, and excellent customer service can set your store apart:
- Provide Clear Contact Information: Display your contact details prominently, making it easy for customers to reach you.
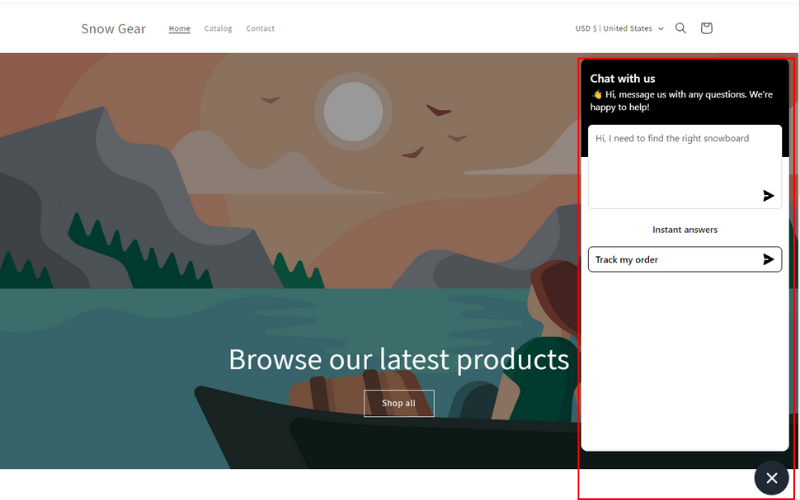
- Offer Live Chat Support: Consider adding live chat support to answer questions in real-time. Shopify offers a free live chat support widget called Shopify Inbox, enabling real-time engagement with customers directly from your dashboard. It’s an integrated solution that’s easy to set up and manage. For those looking for more advanced features, paid tools like Tidio and Gorgias are also available. Implementing live chat, especially through Shopify Inbox, can be a valuable addition to your customer service toolkit.
- Create Helpful FAQs: Compile a list of frequently asked questions and answers to assist customers. Here is a detailed guide on how to create a FAQ page in your store for additional learning.
- Encourage Reviews and Testimonials: Encourage satisfied customers to leave positive reviews, showcasing social proof. There are many apps on the Shopify app store that can help you generate more reviews from your customers, but we recommend Judge.me as the best option based on affordability and features.
Managing Orders and Customer Service
Managing orders and providing exceptional customer service are fundamental to the success of your Shopify store. Efficient order processing and responsive customer support can lead to satisfied customers and repeat business. In this section of our Shopify tutorial for beginners, we’ll guide you through order processing and how to provide top-notch customer service.
Order Processing
Processing orders efficiently ensures timely delivery and customer satisfaction. Here’s how to manage orders in Shopify: Access your orders by navigating to “Orders” in your Shopify dashboard.
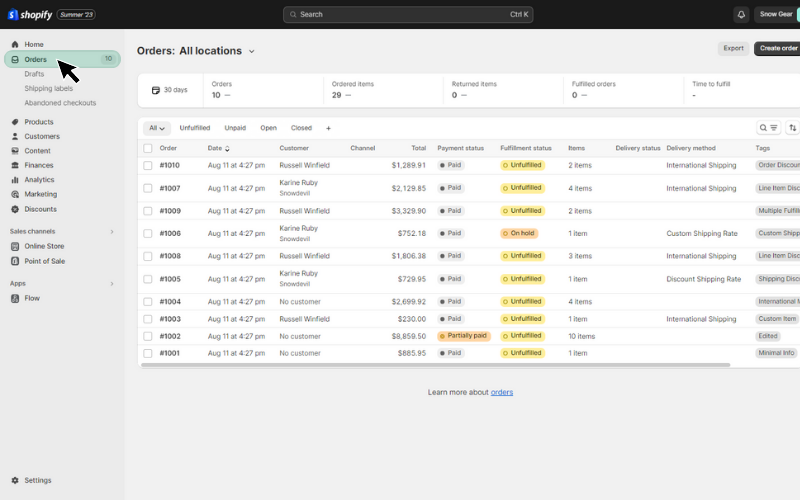
- Processing Orders: Review order details, confirm payment, and prepare the items for shipping.
- Updating Order Status: Order status will automatically update once you have fulfilled and shipped the order.
- Handling Cancellations and Refunds: Manage cancellations and refunds through the order details page, ensuring clear communication with the customer.
- Providing Exceptional Customer Service: Customer service is not just about resolving issues; it’s about enhancing the overall shopping experience. Here’s how to excel:
- Offer Multiple Contact Channels: Provide email, phone, and live chat options for customers to reach you.
- Respond Promptly: Aim to respond to customer inquiries within a reasonable time frame, showcasing your commitment to their needs.
- Implement a Clear Return Policy: Clearly outline your return and exchange policies, making them easily accessible on your site.
- Personalize Customer Interactions: Use the customer’s name and personalize responses to create a more engaging and human experience.
Understanding Return Policies
A clear and fair return policy can enhance trust and encourage purchases. Consider the following:
- Outline the Return Process: Clearly explain how customers can initiate a return or exchange.
- Set Return Timeframes: Define the time frame within which returns or exchanges must be made.
- Specify Conditions: Detail any conditions that must be met for a return, such as the item being in its original packaging.
Pro Tip: If you are just starting out you can use create a return and refund policy within your Shopify dashboard. To do this go to “Settings” > “Policies.” Then location the “Return policy” section and click on “Create from template” and voila Shopify will add the return policy to the text box. Make sure to review and edit anything that you need to change before saving.


Analyzing and Improving Performance
Analyzing and improving performance is essential for the growth and success of your Shopify store. By understanding your store’s metrics, you can identify areas for improvement and make informed decisions. In this section of our Shopify tutorial for beginners, we’ll explore how to use Shopify Analytics, monitor sales and traffic, and focus on continuous improvement.
Shopify Analytics provides valuable insights into your store’s performance. Here’s how to make the most of it: From your Shopify dashboard, navigate to “Analytics.”

- Understand Key Metrics: Familiarize yourself with essential metrics like total sales, conversion rate, average order value, and customer retention rate.
- Analyze Sales Reports: Dive into sales reports to understand what products are performing well and where improvements can be made.
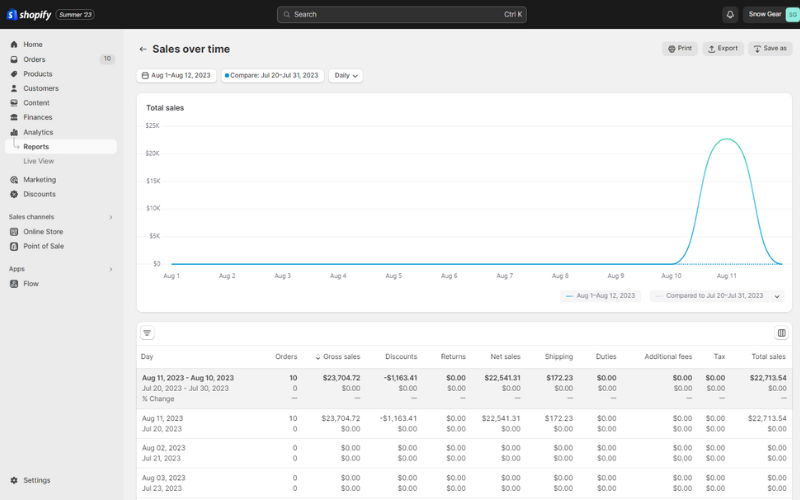
- Track Customer Behavior: Monitor how customers interact with your store, such as the pages they visit and the path they take to purchase.
Monitoring Sales and Traffic
Keeping an eye on sales and traffic helps you gauge the effectiveness of your marketing efforts and overall store performance:
- Use Real-Time Reports: Shopify offers real-time reports to track sales and visitor activity.
- Analyze Traffic Sources: Understand where your traffic is coming from, such as search engines, social media, or referrals.
- Monitor Sales Trends: Look for patterns in sales, such as seasonal trends or the impact of promotions.

Tips and Tricks for Success
Running a successful Shopify store requires more than just setting up and managing the store. It involves a continuous learning process, experimentation, and adaptation to the ever-changing e-commerce landscape. In this final section of our Shopify tutorial for beginners, we’ll share some valuable tips and tricks that can help you achieve success with your online store.
Utilizing Shopify Apps
Shopify’s App Store offers a plethora of tools to enhance your store’s functionality:
- Explore Available Apps: Browse through categories like marketing, sales, customer support, and more.

- Choose the Right Apps: Select apps that align with your store’s needs and goals. Read reviews and consider free trials if available.
- Monitor App Performance: Regularly review how apps are impacting your store’s performance and make adjustments as needed.
Connecting with Other Shopify Entrepreneurs
Networking and learning from others can provide valuable insights:
Join Shopify Communities
Participate in forums, Facebook groups, or local meetups dedicated to Shopify entrepreneurs. A standout example is the Unofficial Shopify Podcast Insiders Facebook group, where members actively engage, share insights, and support one another. Complementing the group is the Unofficial Shopify Podcast, offering valuable episodes filled with expert advice and e-commerce strategies.
Implementing Loyalty Programs
Loyalty programs can encourage repeat purchases and enhance customer retention. Many Shopify apps offer loyalty program functionalities. Here’s a few of the top loyalty apps on the Shopify App Store:
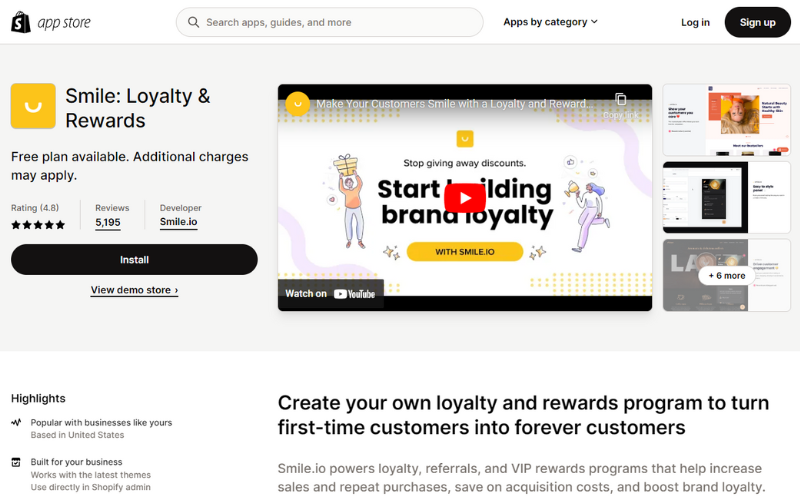
Smile.io: A popular choice that integrates with Shopify, allowing you to create points, VIP, and referral programs.
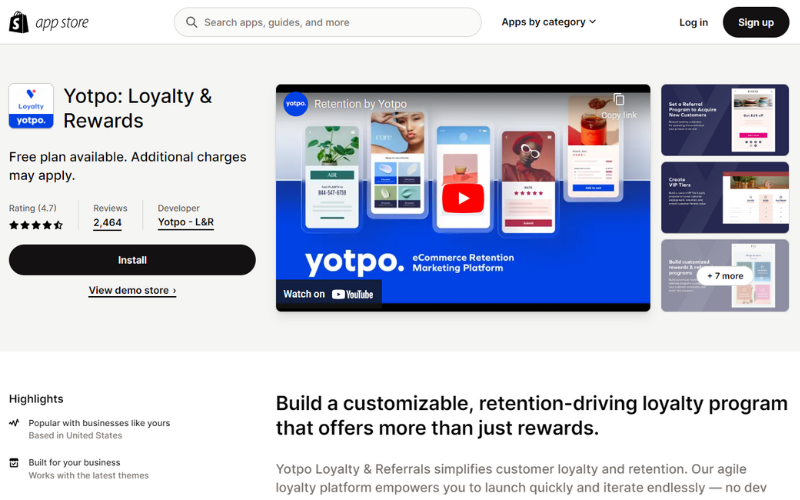
Yotpo Loyalty & Rewards: This app offers customizable rewards programs to increase customer engagement and loyalty.
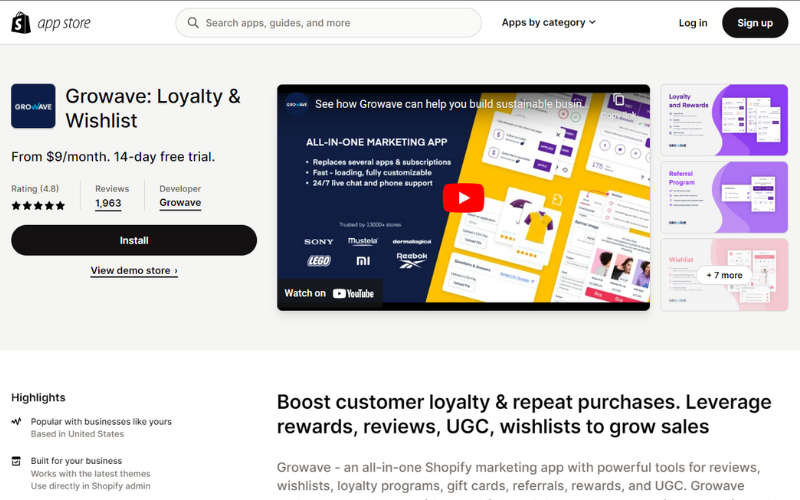
Growave: This all-in-one marketing platform includes a loyalty and rewards feature, enabling you to create a variety of reward options.
Design Your Program: Define the rules, rewards, and how customers can earn and redeem points.
- Set Clear Rules: Outline how customers can earn points, such as through purchases, referrals, or social media engagement.
- Offer Appealing Rewards: Provide attractive incentives like discounts, free products, or exclusive content.
Promote Your Program: Make sure your customers are aware of the program through email marketing, social media, and in-store promotions.
- Email Marketing: Send targeted emails to introduce the program and highlight benefits.
- Social Media Promotion: Share the program on your social channels to reach a broader audience.
Staying Informed and Adapting to Trends
The e-commerce landscape is dynamic, and staying informed can keep you ahead:
- Follow Industry Blogs and News: Stay updated with the latest e-commerce trends, news, and best practices.
- Analyze Competitor Strategies: Regularly check what your competitors are doing and learn from their successes and failures.
- Adapt to Market Changes: Be flexible and willing to adapt your strategies based on market trends and customer feedback.
Unlocking Success with our Shopify Tutorial: A Final Word
Embarking on your Shopify journey is an exciting and rewarding endeavor. From setting up your online store to designing, adding products, configuring payments, implementing marketing strategies, managing orders, analyzing performance, and applying various tips and tricks, there’s a lot to explore and master.
This comprehensive Shopify tutorial for beginners has aimed to guide you through each essential aspect of creating and running a successful online store. Whether you’re just starting out or looking to enhance your existing store, these insights and best practices can serve as a valuable roadmap.
Remember, success requires continuous learning, adaptation, and a customer-centric approach. Don’t hesitate to experiment, seek community support, and utilize the plethora of tools and resources available within the Shopify ecosystem.
Your online store is not just a business; it’s a reflection of your passion, creativity, and entrepreneurial spirit. Embrace the journey with enthusiasm and determination, and watch your Shopify store flourish.


Pingback: What is Shopify and How Does Shopify Work?
Pingback: The 6 Best Ecommerce Platforms of 2023